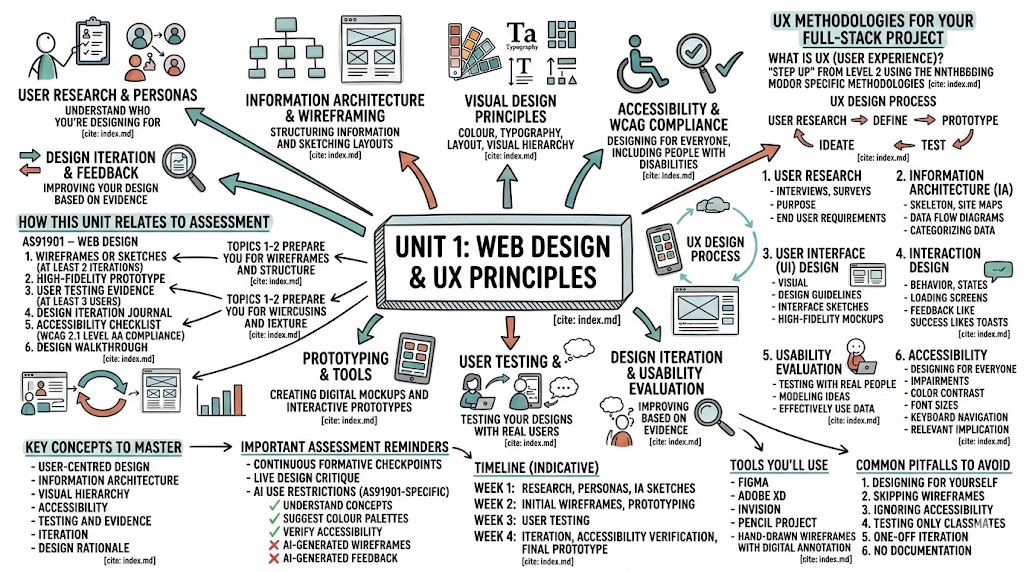
Unit 1: Web Design & UX Principles
This unit prepares you for AS91901 – Web Design, a 4-week internal assessment focused on user experience (UX) and user interface (UI) design.
Unit Overview
You will learn to: - understand user needs and research methods - design websites that are accessible and usable for everyone - create wireframes and high-fidelity prototypes - test your designs with real users - iterate and improve based on evidence
By the end of this unit, you will have designed a functional, accessible website prototype backed by evidence of user testing and iterative improvement.
Topics in This Unit
- 1. User Research & Personas — Understanding who you're designing for
- 2. Information Architecture & Wireframing — Structuring information and sketching layouts
- 3. Visual Design Principles — Colour, typography, layout, and visual hierarchy
- 4. Accessibility & WCAG Compliance — Designing for everyone, including people with disabilities
- 5. Prototyping & Tools — Creating digital mockups and interactive prototypes
- 6. User Testing & Usability Evaluation — Testing your designs with real users
- 7. Design Iteration & Feedback — Improving your design based on evidence
How This Unit Relates to Assessment
AS91901 – Web Design requires you to submit:
- Wireframes or sketches documenting your design evolution (at least 2 iterations)
- High-fidelity prototype demonstrating visual design, layout, and interaction
- User testing evidence from at least 3 real users
- Design iteration journal showing changes made in response to feedback
- Accessibility checklist verifying WCAG 2.1 Level AA compliance
- Design walkthrough where you explain your decisions and reasoning
This unit's topics directly map to these requirements:
- Topics 1–2 prepare you for wireframes and structure
- Topics 3, 5 prepare you for high-fidelity prototypes
- Topics 4 prepare you for accessibility requirements
- Topics 6–7 prepare you for user testing and iteration evidence

Mastering UX Methodologies for Your Full-Stack Project
Welcome to the first stage of your year-long development journey! Before you write a single line of JavaScript for your API or build your database backend, you need to understand who you are building for and how they will interact with your creation.
For Achievement Standard 91901, you aren't just "making a design"; you are applying User Experience (UX) methodologies to ensure your digital outcome is actually fit for purpose [2, 3].
What is UX (User Experience)?
UX is the "step up" from Level 2. While Level 2 focused on conventions, Level 3 requires you to use specific methodologies to generate, model, and test your ideas [2, 4]. It is the difference between a website that just "works" and one that feels intuitive and efficient.
To meet the standard, you must investigate at least two of the following methodologies [5, 6]:

1. User Research
Before you design your API endpoints, you need to understand the purpose of your outcome and the requirements of your end users [6, 7]. * What it involves: Interviews, surveys, or observing people to see what problems they face. * Relevance: If your API tracks fitness data, your research tells you which JSON fields (data points) your users actually care about.
2. Information Architecture (IA)
This is the "skeleton" of your application. It’s about how information is organized and structured [8]. * What it involves: Creating site maps or data flow diagrams. * Relevance: Since you are building an API and a database, IA is critical. You need to decide how your data is categorized so your JavaScript frontend can fetch it logically.
3. User Interface (UI) Design
This is the visual part of the experience. The standard suggests using design guidelines to inform your work [7, 8]. * What it involves: Creating interface sketches or high-fidelity mockups. * Relevance: Your JS framework frontend needs to be clean. UI design helps you determine where buttons and data displays go before you start coding the CSS.
4. Interaction Design
Focuses on the "behavior" of the app. How does the system respond when a user clicks a button [8]? * What it involves: Designing "states" (e.g., What does the "Loading" screen look like while the frontend waits for the API response?). * Relevance: In modern JS frameworks, smooth transitions and feedback (like "Success" toasts after a database update) make an app feel professional.
5. Usability Evaluation
Testing your design with real people to see if they can actually use it [8, 9]. * What it involves: "Modelling" your ideas—showing a paper sketch to a classmate and asking, "How would you find the settings page?" [9, 10]. * Relevance: You must effectively use data from this testing to improve your project before you code it [6, 11].
6. Accessibility
Designing for everyone, including people with impairments [8]. * What it involves: Checking color contrast, font sizes, and keyboard navigation. * Relevance: Accessibility is a major relevant implication at Level 3. A "refined" design must justify how it addresses the needs of all potential end users [8, 12].

Your Objective: The Investigation
To get started with AS 91901, you need to: 1. Select a Context: What is your application's purpose [6, 7]? 2. Explain the End Users: Who are they and what do they need [6]? 3. Investigate: Research at least two of the UX methodologies above and summarize your findings [6, 7].
Pro-Tip for Excellence: Don't just pick methodologies because they are on the list. Choose the ones that will actually help you build a better API. Later, you will need to justify why these methodologies were the right choice for your specific project [12].
Key Concepts to Master
By the end of this unit, you must understand and be able to explain:
- User-centred design: Why designing for users, not for yourself, leads to better outcomes
- Information architecture: How to organize content so users can find what they need
- Visual hierarchy: How to use size, colour, and contrast to guide user attention
- Accessibility: Why universal design benefits everyone, not just people with disabilities
- Testing and evidence: Why user testing reveals problems that designers miss
- Iteration: How feedback loops create better designs than one-shot efforts
- Design rationale: Why you made specific choices and how they serve user needs
Important Assessment Reminders
Continuous Formative Checkpoints
Your teacher will collect evidence weekly: - Design sketches and iterations - User testing notes and feedback summaries - Design rationale explanations - Progress in your iteration journal
This is not optional. Formative checkpoints help you stay on track and give your teacher visibility into your thinking.
Live Design Critique
Before final submission, you will participate in a design critique session where you: - present your prototype to your teacher - explain key design decisions and their rationale - demonstrate how user testing informed your iterations - justify accessibility compliance choices
Your teacher will ask questions like: - Why did you choose this colour scheme? - How did this user's feedback change your layout? - What accessibility principle does this feature address?
If you can't explain your design, it's not valid evidence—no matter how professional the prototype looks.
AI Use Restrictions (AS91901-Specific)
- ✗ AI-generated wireframes or mockups are not acceptable as final evidence
- ✗ AI-generated user feedback or testing summaries are not acceptable
- ✓ AI tools may help you understand concepts (e.g., "explain colour contrast ratios")
- ✓ AI tools may suggest colour palettes or design inspiration (must be cited)
- ✓ AI tools may verify accessibility (e.g., contrast checkers)
Timeline (Indicative)
- Week 1: User research, personas, information architecture sketches
- Week 2: Initial wireframes, prototyping tool introduction, first prototype draft
- Week 3: User testing (recruit testers, conduct sessions, summarize feedback)
- Week 4: Design iteration, accessibility verification, final prototype, documentation

Tools You'll Use
Recommended tools for wireframing and prototyping: - Figma (free tier available; cloud-based; collaborative) - Adobe XD (student access via school) - InVision (prototyping and collaboration) - Pencil Project (open-source; desktop-based) - Hand-drawn wireframes with digital annotation (acceptable and often faster)
Your teacher will demonstrate these tools; choose the one that works best for you.
Common Pitfalls to Avoid
- Designing for yourself, not users: Just because you like a design doesn't mean users can navigate it. Test with real users.
- Skipping wireframes: Jumping straight to high-fidelity design wastes time. Wireframes are fast; use them to test structure before investing in visual design.
- Ignoring accessibility: WCAG compliance is not optional; it's a minimum threshold. Don't leave it as an afterthought.
- Testing only classmates: Your classmates know the design; they're biased. Test with people unfamiliar with your project.
- One-off iteration: Feedback is not a checklist; iteration is a cycle. If you change one element, verify it doesn't break something else.
- No documentation: Your teacher can't give you credit for thinking you didn't document. Keep an iteration journal from day one.

External Resources
User Research & UX Thinking
- Nielsen Norman Group – UX Articles – Authoritative UX research and best practices
- Design Thinking: The Beginner's Guide – Video overview of design thinking process
Wireframing & Prototyping
- Figma Learning Resources – Official Figma tutorials and guides
- The Wireframing Handbook (Maze.co) – Practical wireframing guide
Accessibility
- WebAIM – Web Accessibility In Mind – Clear accessibility guidance and tools
- WCAG 2.1 Quick Reference – Official WCAG checklist
- Accessibility for Everyone (A11ycasts by Google) – YouTube series on practical accessibility
Design Principles
- Laws of UX by Jon Yablonski – Interactive guide to core design principles
- Gestalt Principles in UX Design – Video explaining visual grouping and hierarchy
User Testing
- How to Conduct Usability Testing – Nielsen Norman guide to planning and running tests
- Steve Krug – Don't Make Me Think – Accessible usability principles (book or video summaries)
Key Vocabulary
- Accessibility: The design of products usable by everyone, including people with disabilities
- Contrast: The difference in brightness or colour between elements; high contrast improves readability
- Information Architecture (IA): The organization of content and navigation structure in a website
- Iterative Design: A process of repeated cycles: design → test → feedback → improve
- Persona: A fictional user profile representing a target audience segment
- Prototype: A functional or visual model of a design, used for testing and feedback
- User Research: Methods to understand user needs, behaviours, and pain points
- User Testing: Observing real users interact with your design to identify usability issues
- Visual Hierarchy: The arrangement of elements to guide user attention (most important ➜ least important)
- Wireframe: A low-fidelity sketch of page layout, focusing on structure, not visual design
Navigating Unit 1
Start with 01_user-research-and-personas.md and work through each topic in order. Each topic builds on previous concepts.
End of Unit 1 Overview