Flask Made Easy – Part 2: Design and Build the Database
Course: 12DGT
Year Level: Year 12 (Level 7 – NCEA Level 2)
Unit / Module: 03_Full_Stack_Website_Project
Aligned Standard(s): AS91893 – Full-Stack Website Project
Series: Flask Made Easy (4 parts) — Part 2 of 4
Estimated Time: 1–2 lessons (~60–90 min)
Video: Flask Made Easy Part 2: Design and Build the Database
1. Purpose of This Tutorial
By the end of this tutorial you will have:
- an Entity Relationship Diagram (ERD) designed for your database
- a working SQLite database file inside your project
- tables created with correct data types, primary keys, and a foreign key
- sample data inserted and verified with SQL queries
- a saved queries file committed to GitHub
Prerequisite: Part 1 must be complete. Your Flask project must exist and be connected to GitHub.
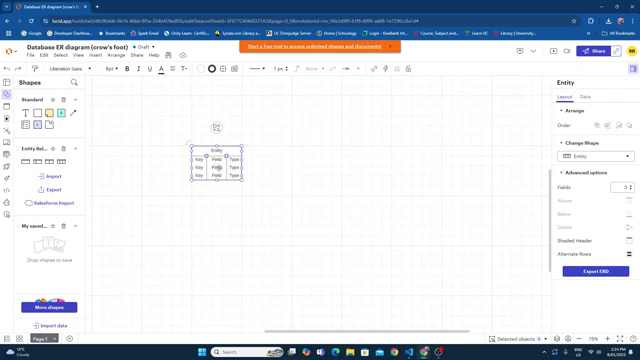
2. Step 1 — Design Your Database (ERD)
Before writing a single line of code, design your data structure. This saves time and prevents mistakes.
Use LucidChart (lucidchart.com) to draw an ERD:
- Create a new blank document
- Search for "ERD" in the template search
- Choose the Crow's Foot ERD template
- Delete the placeholder tables and design your own
What to include in your ERD
Use the three-field table style: Key | Field Name | Data Type
Your database must have at least two tables connected by a one-to-many relationship.
Example — Motorbike database:
MAKERS
+----+----------+------+
| PK | maker_id | INT  |
|    | name     | TEXT |
+----+----------+------+

BIKES
+----+----------+------+
| PK | bike_id  | INT  |
| FK | maker_id | INT  |  → references MAKERS.maker_id
|    | model    | TEXT |
|    | year     | INT  |
|    | engine   | TEXT |
|    | image_url| TEXT |
+----+----------+------+
Choose your own topic. It does not have to be motorbikes. Pick something you are interested in — films, games, sports teams, recipes — as long as it has a natural one-to-many relationship.
What makes a good one-to-many relationship?
One maker can have many bikes — but each bike belongs to exactly one maker. This is a one-to-many relationship and it is the most common pattern in databases.
Keep it simple. Real databases are complex. Yours only needs a few fields per table. You can always add more later.
3. Step 2 — Install the SQLite 3 Editor Extension
You will manage your database directly inside VS Code using the SQLite 3 Editor extension.
- Open the Extensions tab in VS Code (Ctrl+Shift+X)
- Search for
SQLite3 Editor - Install the one by YY0931 (look for the spinning feather icon)
This extension lets you create tables, insert data, and run queries without leaving VS Code. It is a simpler alternative to SQLite Studio.
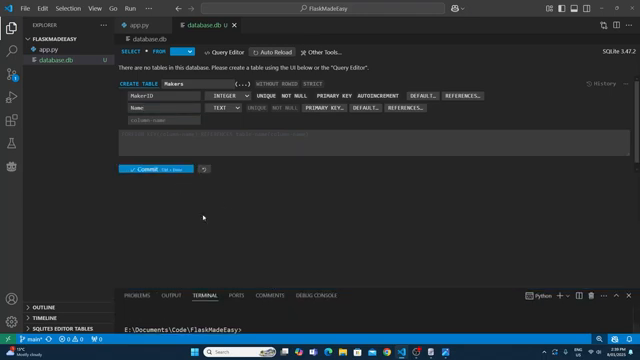
4. Step 3 — Create the Database File
In your project folder, create a new file called database.db.
Because you have the SQLite 3 Editor extension installed, VS Code will offer you a visual editor when you open this file.
Naming matters. Call it
database.dbnow. You will reference this exact filename in your Python code later.
5. Step 4 — Create Your Tables
Creating the first table (e.g. makers)
In the SQLite 3 Editor, click Create Table. Add your columns one by one.
For the primary key column (maker_id):
- Type:
INTEGER - Check: Primary Key, Auto Increment, Unique, Not Null
All four settings are required for the primary key to work correctly. If you miss one, the table will not behave as expected.
For the name column:
- Type:
TEXT - No other settings needed
Click Commit when done. The table disappears from view — this is normal. It is saved.
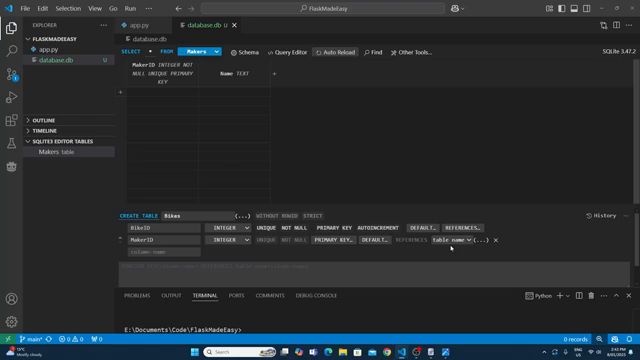
Creating the second table (e.g. bikes)
In the SQLite 3 Editor panel (usually at the bottom), find the Tables section and drag it up to make it visible. Click the option to create a new table.
For bike_id (primary key): Same settings as above — INTEGER, Primary Key, Auto Increment, Unique, Not Null.
For maker_id (foreign key): This is slightly different:
- Type:
INTEGER - Set References to:
makers→maker_id
This creates the link between the two tables.
Add the rest of your columns with appropriate data types.
Click Commit when done.
SQLite data types
| Data Type | Use for |
|---|---|
INTEGER | Whole numbers (IDs, years, counts) |
TEXT | Strings, names, URLs, descriptions |
REAL | Decimal numbers (prices, ratings) |
BLOB | Binary data (images stored as files) |
6. Step 5 — Insert Sample Data
You need actual data in your database so you can test queries and eventually display it on your website.
Insert via the editor
Click on the makers table in the editor. You can click cells to add values directly. Add 3–4 rows (e.g. Yamaha, Suzuki, Kawasaki, Honda). Click Commit after each row.
Verify the foreign key works
Open your bikes table in the editor. Click on the maker_id column for a new row. If your tables are linked correctly, you will see a dropdown showing the existing makers. This confirms the relationship is working.
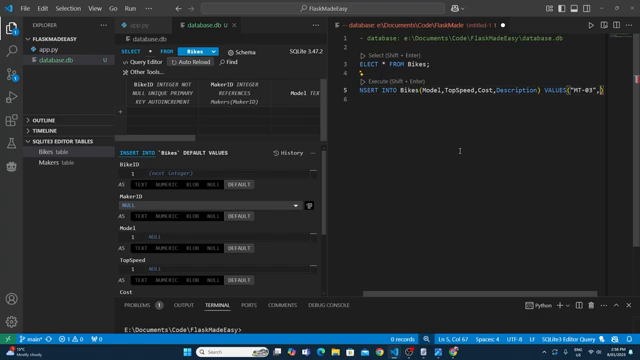
Use SQL INSERT statements for the main table
Rather than clicking each cell individually, use the Query Editor (look for the query editor tab in the SQLite 3 Editor). This is faster for inserting multiple rows.
Write an INSERT statement:
INSERT INTO bikes (maker_id, model, year, engine, image_url)
VALUES (1, 'MT-03', 2023, '321cc parallel twin', '');
Run it, then check the table to confirm the row was added.
Tip: Use an AI tool (ChatGPT, Gemini) to generate a batch of INSERT statements for your data. Give it your table schema and ask for 8–10 rows. Paste the result into the query editor and run them one at a time.
After inserting rows, check the maker_id values are correct. If they are missing or wrong, you can update them manually in the editor and commit.
7. Step 6 — Write and Save Test Queries
Before moving on, write SQL queries to verify your data is correct. Save these queries — you will reuse them later when connecting Flask to the database.
Create a new file in your project called queries.sql. Write and test each of the following types of queries:
-- Get all records from your main table
SELECT * FROM bikes;

-- Get records with a JOIN (combining data from both tables)
SELECT bikes.bike_id, makers.name, bikes.model, bikes.year
FROM bikes
JOIN makers ON bikes.maker_id = makers.maker_id;

-- Get a single record by ID
SELECT * FROM bikes WHERE bike_id = 1;

-- Get all records for a specific maker
SELECT * FROM bikes WHERE maker_id = 2;
Run each query in the Query Editor and check the results are what you expect. If results look wrong, fix your data now — it is much easier to do before Flask is involved.
Reference: Use W3Schools SQL if you need to revise SQL syntax. SQL knowledge from earlier in the course applies directly here.
When VS Code asks if you want to save queries.sql, save it in your project folder.
8. Checking Data Integrity
Before committing, run these checks:
- Every row in
bikeshas a validmaker_idthat exists inmakers - No required fields (model, year, etc.) are empty
- Your JOIN query returns the expected combined data
- You have at least 6–8 rows in your main table
What goes wrong: Students insert data with missing foreign keys, then wonder why their JOIN queries return nothing. Check your data now.
9. Step 7 — Commit to GitHub
You have done significant work. Commit it now.
In the Source Control tab:
- Stage all changes
- Write a meaningful commit message:
add database with makers and bikes tables - Commit and Sync
Your database.db and queries.sql files should now appear in your GitHub repository.
10. Common Issues
| Problem | Likely cause | Fix |
|---|---|---|
| Table seems to disappear after creating | Normal — click Commit, then look in Tables panel | Drag up the Tables panel to see your tables |
| Dropdown does not appear for foreign key field | Tables not linked correctly | Check the References setting on the FK column |
| Query editor loses connection | Extension timeout | Click reconnect at the top of the query editor |
| JOIN returns no results | maker_id values are wrong or missing | Update the FK values in the editor and commit |
| INSERT fails | Wrong column names or data types | Compare your SQL to your table schema |
11. Checkpoint
Before moving to Part 3, confirm all of the following:
- You have an ERD showing at least two tables with a one-to-many relationship
-
database.dbexists in your project folder with both tables created - You have at least 6–8 rows of sample data in your main table
- The foreign key relationship is working (dropdown appears in editor)
-
queries.sqlcontains tested SELECT and JOIN queries - Everything is committed and synced to GitHub
12. Key Vocabulary
- ERD (Entity Relationship Diagram): A diagram showing database tables, their fields, and how they are related.
- Entity: A table in the database — represents a category of data (e.g. Bikes, Makers).
- Primary Key (PK): A unique identifier for each row in a table. Usually an auto-incrementing integer.
- Foreign Key (FK): A column in one table that references the primary key of another table. Creates the relationship.
- One-to-Many: A relationship where one record in table A can relate to many records in table B (e.g. one maker has many bikes).
- Auto Increment: SQLite automatically assigns the next available integer when a new row is inserted.
- Data Type: The kind of data a column holds — INTEGER, TEXT, REAL, etc.
- SQLite: A lightweight, file-based SQL database. No separate server needed — the entire database is a single
.dbfile. - Query: A SQL statement that retrieves, inserts, updates, or deletes data.
- JOIN: A SQL clause that combines rows from two tables based on a related column.
- Data Integrity: Ensuring the data in the database is accurate, complete, and consistent.
End of Flask Made Easy — Part 2: Design and Build the Database