Flask Made Easy – Part 4: Front End
Course: 12DGT
Year Level: Year 12 (Level 7 – NCEA Level 2)
Unit / Module: 03_Full_Stack_Website_Project
Aligned Standard(s): AS91893 – Full-Stack Website Project
Series: Flask Made Easy (4 parts) — Part 4 of 4
Estimated Time: 2 lessons (~90–120 min)
Video: Flask Made Easy Part 4: Front End
1. Purpose of This Tutorial
By the end of this tutorial you will have:
- a wireframe design for both pages of your application
- image URLs added to your database records
- a shared
layout.htmlbase template with a header and navigation bar - a home page (
home.html) displaying all records in a responsive grid - a detail page (
bike.html) showing a single record with image and information - CSS styling using W3.CSS and a custom Google Font
- a complete, working Flask web application committed to GitHub
Prerequisite: Parts 1–3 must be complete. Your Flask app must be returning database data through both routes.
2. Step 1 — Design Before You Code
Before writing any HTML, sketch a rough wireframe for your two pages. It does not have to be detailed — a pencil sketch or a quick diagram is enough. What matters is that you have thought about:
- What the header and navigation will look like (shared across pages)
- How the home page will display multiple items (e.g. a grid)
- What the detail page will show for a single item (e.g. image + info)
Example wireframe concept:
┌────────────────────────────────────────────────┐
│  HEADER: Site Title                            │  ← shared
│  NAV: Home                                     │  ← shared
├────────────────────────────────────────────────┤
│  HOME PAGE                                     │
│  ┌──────┐  ┌──────┐  ┌──────┐                 │
│  │ img  │  │ img  │  │ img  │                 │  ← 3-column grid
│  │ name │  │ name │  │ name │                 │
│  └──────┘  └──────┘  └──────┘                 │
└────────────────────────────────────────────────┘

┌────────────────────────────────────────────────┐
│  HEADER: Site Title                            │
│  NAV: Home                                     │
├──────────────────┬─────────────────────────────┤
│  Image           │  Name, Year, Engine...      │  ← 2-column layout
│                  │                             │
└──────────────────┴─────────────────────────────┘
Also decide on:
- Colour scheme — try coolors.co to generate a palette
- Font — browse Google Fonts and pick one you like

Keeping design simple is a skill. A clean black-and-white layout with one accent colour and one good font looks more professional than something over-complicated. You can always refine later.
3. Step 2 — Add Image URLs to Your Database
Your records probably have an empty image_url column right now. You need to fill these in.
Option A: Use image URLs from the web
- Search for an image of your item
- Right-click the image → Copy image address
- Open your
database.dbin the SQLite 3 Editor - Find the row and paste the URL into the
image_urlcolumn - Click Commit
Repeat for each record.
Copyright: If you are using images from web searches for educational, non-commercial purposes, this is generally considered fair use. Use images from different sources rather than one site to reduce risk. Do not publish to a public-facing production site without checking image licences.
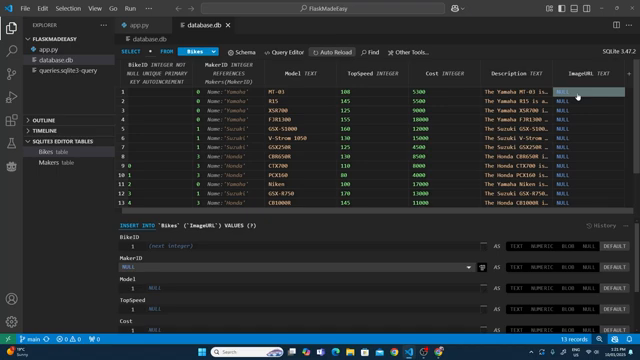
Consistency matters: Try to find images that are approximately the same aspect ratio (e.g. all landscape, similar proportions). Mismatched image ratios will make your grid look messy.
Option B: Store images locally
Create a folder called static inside your project folder, and inside that a folder called images. Save your image files there.
Reference them in your database like this:
/static/images/my-image.png
This approach gives you full control over the images, but requires you to download and crop them yourself.
4. Step 3 — Create the Flask Folder Structure
Flask expects templates and static files to be in specific folders.
Inside your project folder, create:
your-project/
├── app.py
├── database.db
├── queries.sql
├── templates/         ← HTML template files go here
│   └── layout.html
└── static/            ← CSS and images go here
    └── style.css
Create the templates and static folders now, along with empty layout.html and style.css files inside them.
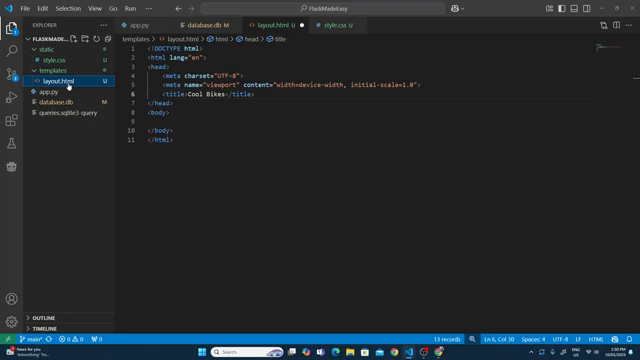
5. Step 4 — Create layout.html (Base Template)
layout.html is the parent template. Every other page will extend from it. This means the header and navbar only need to be written once.
Open templates/layout.html and write:
<!DOCTYPE html>
<html lang="en">
<head>
    <meta charset="UTF-8">
    <meta name="viewport" content="width=device-width, initial-scale=1.0">
    <title>My Flask App</title>

    <!-- Google Font (replace 'Righteous' with your chosen font) -->
    <link rel="preconnect" href="https://fonts.googleapis.com">
    <link href="https://fonts.googleapis.com/css2?family=Righteous&display=swap" rel="stylesheet">

    <!-- W3.CSS framework -->
    <link rel="stylesheet" href="https://www.w3schools.com/w3css/4/w3.css">

    <!-- Your custom CSS (must come after W3.CSS to override it) -->
    <link rel="stylesheet" href="{{ url_for('static', filename='style.css') }}">
</head>
<body class="w3-container">

    <!-- Shared header -->
    <div class="w3-container w3-padding">
        <h1>Cool Bikes</h1>
    </div>

    <!-- Shared navigation bar -->
    <div class="w3-bar w3-blue-grey">
        <a href="/" class="w3-bar-item w3-button">Home</a>
    </div>

    <!-- Page-specific content goes here -->
    {% block body %}
    {% endblock %}

</body>
</html>
Key points:
| Part | Explanation |
|---|---|
url_for('static', filename='style.css') | Flask's way of linking to files in the static folder. Do not use a plain relative path. |
| W3.CSS link | A lightweight CSS framework that provides ready-made classes for layout, cards, and nav bars |
| Google Fonts link | Loads your chosen font from Google's servers |
{% block body %} | A Jinja2 placeholder. Child templates fill this block with their own content. |
Why
url_for? Flask generates the correct file path automatically, regardless of where your app is running. A plain relative path like../static/style.csscan break depending on the route.
Order of stylesheets matters. W3.CSS must come before your custom CSS. Your CSS overrides W3.CSS — if it loads first, W3.CSS will overwrite your changes.
6. Step 5 — Add Your Font to style.css
Open static/style.css and apply the font:
body, h1, h2, h3, p {
    font-family: 'Righteous', sans-serif;
}

img {
    width: 100%;
}
Replace 'Righteous' with your chosen font name (copy it exactly from Google Fonts). The img rule ensures images fill their container, which is important for the grid layout.
7. Step 6 — Test the Layout
Before building the home page, confirm that layout.html renders. Update your home route in app.py to render it:
from flask import Flask, g, render_template
@app.route('/')
def home():
    sql = """
        SELECT bikes.bike_id, makers.name, bikes.model, bikes.image_url
        FROM bikes
        JOIN makers ON bikes.maker_id = makers.maker_id
    """
    results = query_db(sql)
    return render_template('layout.html', results=results)
Run the app and check the browser. You should see your header and navbar. If the font does not appear, check the order of your stylesheet links.
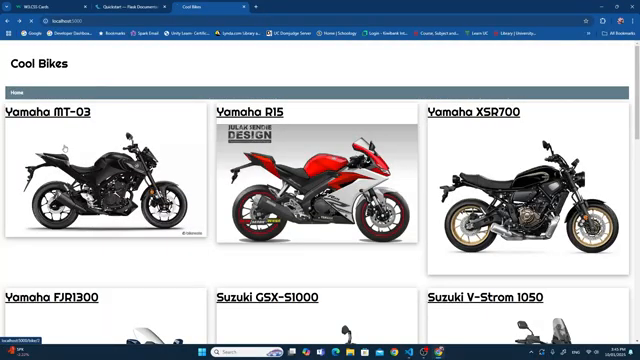
8. Step 7 — Create home.html
Create templates/home.html:
{% extends 'layout.html' %}

{% block body %}

<div class="three-column">
    {% for bike in results %}
    <a href="{{ url_for('bike', id=bike[0]) }}">
        <div class="w3-card-4">
            <h3>{{ bike[1] }} {{ bike[2] }}</h3>
            <img src="{{ bike[3] }}" alt="{{ bike[2] }}">
        </div>
    </a>
    {% endfor %}
</div>

{% endblock %}
What each part does:
| Part | Explanation |
|---|---|
{% extends 'layout.html' %} | Inherits the layout. Everything in {% block body %} replaces the block in the parent. |
{% for bike in results %} | Jinja2 for loop — runs once for each row returned by the query. |
bike[0], bike[1], bike[2], bike[3] | Index into the tuple. The order matches the columns in your SELECT statement. |
url_for('bike', id=bike[0]) | Generates the correct URL for the dynamic route (e.g. /bikes/3). |
w3-card-4 | A W3.CSS class that adds a card-style shadow and border. |
Identify your column indices
Check your SELECT statement:
SELECT bikes.bike_id, makers.name, bikes.model, bikes.image_url
| Index | Value |
|---|---|
[0] | bike_id |
[1] | makers.name |
[2] | bikes.model |
[3] | bikes.image_url |
Adjust the indices to match your own query columns.
Add the grid CSS
In style.css, add:
.three-column {
    display: grid;
    grid-template-columns: 1fr 1fr 1fr;
    gap: 20px;
    padding: 20px;
}
Update the home route to render home.html
@app.route('/')
def home():
    sql = """
        SELECT bikes.bike_id, makers.name, bikes.model, bikes.image_url
        FROM bikes
        JOIN makers ON bikes.maker_id = makers.maker_id
    """
    results = query_db(sql)
    return render_template('home.html', results=results)
Refresh the browser. You should see all your records displayed as a grid of cards with images and names.
9. Step 8 — Create bike.html
Create templates/bike.html:
{% extends 'layout.html' %}

{% block body %}

<div class="two-column">
    <div>
        <img src="{{ bike[5] }}" alt="{{ bike[2] }}">
    </div>
    <div class="info">
        <h2>{{ bike[1] }} {{ bike[2] }}</h2>
        <h3>Year: {{ bike[3] }}</h3>
        <h3>Engine: {{ bike[4] }}</h3>
    </div>
</div>

{% endblock %}
Add the grid CSS in style.css:
.two-column {
    display: grid;
    grid-template-columns: 1fr 1fr;
    gap: 20px;
    padding: 20px;
}
Update the bike route to render bike.html
@app.route('/bikes/<int:id>')
def bike(id):
    sql = """
        SELECT bikes.bike_id, makers.name, bikes.model,
               bikes.year, bikes.engine, bikes.image_url
        FROM bikes
        JOIN makers ON bikes.maker_id = makers.maker_id
        WHERE bikes.bike_id = ?
    """
    result = query_db(sql, (id,), one=True)
    return render_template('bike.html', bike=result)
Note: the data is sent to the template as bike=result — inside the template, bike refers to the single row tuple.
Check your column indices match your query:
| Index | Value |
|---|---|
[0] | bike_id |
[1] | makers.name |
[2] | bikes.model |
[3] | bikes.year |
[4] | bikes.engine |
[5] | bikes.image_url |
10. Test the Complete Application
- Reload the home page — all cards should appear with images
- Click a card — you should go to the correct detail page for that item
- Use the browser back button and click a different card — it should show different data
- Try navigating directly to
/bikes/1,/bikes/2,/bikes/3in the URL bar
If all of these work, your application is functionally complete.
11. How Template Inheritance Works
layout.html defines the shared structure. Child templates (home.html, bike.html) fill in the {% block body %} section with their own content. The header and nav are written once and shared across all pages automatically.
12. How Jinja2 Templating Works
Jinja2 is Flask's templating language. It lets you embed Python-like logic inside HTML files.
| Syntax | Purpose | Example |
|---|---|---|
{{ value }} | Output a value | {{ bike[2] }} → displays model name |
{% for x in list %} | Loop | {% for bike in results %} |
{% endfor %} | End a loop | Required after every for loop |
{% extends 'file.html' %} | Inherit from a parent template | {% extends 'layout.html' %} |
{% block name %} | Define a replaceable section | {% block body %} |
{% endblock %} | End a block | Required after every block |
url_for('function', param=value) | Generate a URL | url_for('bike', id=bike[0]) |
13. Common Issues
| Problem | Likely cause | Fix |
|---|---|---|
| CSS not loading | Wrong path or stylesheet order | Use url_for('static', ...) and check link order |
| Font not appearing | Stylesheet order wrong | W3.CSS before Google Fonts before your CSS |
| Images not displaying | Wrong URL in database or broken link | Check image URLs in your database |
| All cards link to the same bike | bike[0] is wrong index | Check your SELECT column order |
| Grid is one column | CSS class name mismatch | Check class name in HTML matches .three-column in CSS |
| Detail page shows wrong data | Wrong column index in template | Count columns from your SELECT statement starting at 0 |
TemplateNotFound error | Wrong filename or not in templates/ folder | Check spelling and location of HTML files |
14. Step 9 — Commit Everything to GitHub
Stage and commit all your changes. You will have changes in:
app.pytemplates/layout.htmltemplates/home.htmltemplates/bike.htmlstatic/style.cssdatabase.db(updated image URLs)
Commit message: add templates and complete front end
15. What Could Be Added Next
This is a working but minimal application. Possible improvements include:
- Filter by category — add a nav link for each maker that shows only their records
- Search — a form that filters records by a keyword
- Better image handling — download images and store in
static/images/for consistent aspect ratios - More pages — an About page, a contact form
- Better styling — a hero image on the home page, hover effects on cards, a consistent colour scheme applied throughout
- Accessibility — check colour contrast, add proper
alttext to all images, test keyboard navigation
16. Checkpoint
Before considering this project complete:
-
templates/folder containslayout.html,home.html, andbike.html -
static/style.csscontains the grid styles and font - Home page shows all records as a grid of clickable cards
- Clicking a card navigates to the correct detail page
- Detail page shows the image and key information for that record
- All database records have image URLs
- Everything committed and synced to GitHub
17. Key Vocabulary
- Template: An HTML file with Jinja2 placeholders that Flask fills with real data before sending to the browser.
render_template(): A Flask function that loads a template, fills in the data, and returns the HTML response.- Template Inheritance: A pattern where a parent template defines shared structure, and child templates fill in the content sections.
{% extends %}: Jinja2 syntax for inheriting from a parent template.{% block %}: A named section in a template that can be overridden by child templates.- Jinja2: The templating language used by Flask. Allows loops, conditions, and variable output inside HTML.
{{ }}: Jinja2 syntax for outputting a variable value into HTML.{% %}: Jinja2 syntax for control structures (for loops, if statements, extends, blocks).url_for(): A Flask/Jinja2 function that generates URLs for routes or static files. Safer and more reliable than hardcoding paths.- W3.CSS: A lightweight CSS framework from W3Schools that provides utility classes for layout, cards, and navigation.
- CSS Grid: A CSS layout system for creating two-dimensional grids. Used here for the 3-column card layout and 2-column detail layout.
static/folder: Where Flask expects to find CSS, JavaScript, and image files.templates/folder: Where Flask looks for HTML template files.- Tuple indexing: Accessing a specific value in a tuple using its position (
bike[0],bike[1], etc.).
End of Flask Made Easy — Part 4: Front End